Showing posts with label free motion quilting. Show all posts

Tuesday, July 21, 2015

Flirty 30s

Here's the finished product of my work with those Flirty 30s prints.

I used some leftover white for the solid, and used the tumblers for the backing.  I'm so happy how this came out, and I really think my in laws will like it.

Tuesday, July 23, 2013

Show Quilt Sneak Peek part 2

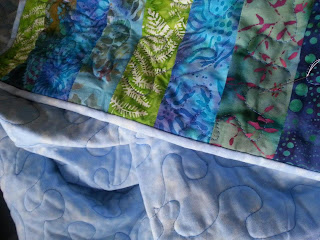
So I know I said I wouldn't post the final quilt, and I won't, but I will post a small sneak peek of the quilting in the fan blades. :)

Sunday, June 16, 2013

The UFOs are getting finished..

Three more UFOs are done and off the list! :)  I'm so happy.  

First up in a miniature Panda quilt.  Quilted on a really crappy machine mostly by me (in 2011 - thank goodness that I've improved!!) and partially by my hubby who was trying to fix my tension issues.  It's cute, but I'm not in love with it (hence why it was a UFO for so long). Started it in 2011, finished on June 16, 2013.  *Jumping for joy* it's done.


Next up is another fairy quilt.  It's my own pattern, quilted mainly by my 4 year old.  She wanted to help me, so I let her.  This one was going to be my sample quilt for my Craftsy shop, but I'll probably be making another one for the display picture.  Kiddo wants to use it as a doll quilt (and it's already in use)


Tuesday, April 30, 2013

Berenstain Bears - UFO Done!

Beam another one up! 
Another UFO is now able to be snuggled under.

Here's a picture of the Berenstain Bears quilt hot off the machine.  It's not the best quilting job ever, but the kiddo wanted this quilt ASAP. Once I got the tension issues fixed up which took about an hour or so I was good to go!


I'll have to get a good picture of it after the kiddo wakes up tomorrow.  Rarely do I do a total machine binding (usually I hand stitch on the back) but kiddo wanted this quilt so much I got it done as fast as I could by doing the entire binding by machine.  It went really quickly and it's not perfect but it's done and kiddo loves it, so that means it's ok with me.

Thursday, April 18, 2013

Moving beyond Stippling (part 1)

Part 1


Disclaimer: By no means am I an expert at free motion quilting. This is ONE method of doing free motion quilting and there are hundreds of different ways. No way is more "right" or "wrong" than others.  You have to find the way or ways that work for you.  Depending on the size of the throat of your machine, you might have to blend a few ways into something that you can work with.


What you need:

A Quilt Top
Here's the top I'll be using.


Tracing Paper; a Pen; Stencil; Quilting Pattern


What you do:

Do a rough layout on your quilt as to where you want the quilting pattern to go.  Test it out - see if it fits.  Play around, you may need to use a photocopier to shrink a quilting pattern. 


Play with the stencil/s. See if it fits your quilt.  It's a process of trial and error. Sometimes they fit, sometimes they don't.  If you're very new to free motion quilting, stick with stencils that are "continuous line" to quilt.  That just means you're not going to start and stop. The whole design will be quilted with ONE huge line. 


Once you've settled on a design, trace the design on tissue paper.


I'd suggest cutting a square, but I forgot to take a picture. Sorry!  So, cut a piece of tissue paper, and trace the stencil onto the tissue paper. If your fabric is dark, pick an ink color that you can see (doesn't matter what color, you'll be quilting over it. Yes, you're actually going to be quilting ON the tissue paper.


Here's a (kinda bad) picture of the traced stencil.


Once you've settled on a design for the border, trace the design on tissue paper. Make as many as you need. Since my quilt is square, I need 4 corner pieces.


If it's a pattern that I'll need more than once (as in the case with the corners) I'll trace one and then check to make sure it fits. It does, so I'll trace 3 more.


Then, continue to trace the rest of the pattern.  The one that I chose to use for this quilt had the corner pieces as well as the border pieces. I got the free pattern at Forest Quilting


When you're done tracing the borders, lay out the tissue paper on the quilt top and see what you think of it.


If you notice, I didn't do the zig zag part yet, or the outer border. I ran out of time tonight, and to be honest, I'm still thinking on how I want to quilt those parts. For right now, I'm thinking that the inner tan part will have small feathers, and maybe pebbling in the zig zag - I'm not quite sure. :)


Real life is going to be kinda crazy the next few days, but I promise that I'll get back to the tutorial next week after I have some time to think on how I want to quilt this one! :)


As another side note:
There are some amazing quilting motifs out there, and a lot are free.  If you like one, don't hesitate to download it/print it/buy it. It is important to note the name of the designer of the motif, especially if you want to put the quilt in a show.


The site that I got the free pattern for the border from is Forest Quilting. Stop by her site, she has a ton of free Quilting Motifs and a bunch of free paper piecing patterns.

Thursday, February 28, 2013

Roberts Quilt - Another UFO done!

Another UFO bites the dust. It's *done.*  Happy dance time.

Look out Robert - it's all yours. a great couch quilt.


Thursday, February 21, 2013

Quilting Practice - Reversible Candle Mat

Practicing my quilting.  The quilting pattern is a free one from Forest Quilting. Doesn't it quilt up beautifully?

It measures about 14"x14"

Currently in use as a candle mat.


Thursday, August 9, 2012

Shades of Green


This is the only good photo I have of my Grandmothers gift.  Green is her favorite color and I wanted to do something to surprise her.

This one is only 3 fabrics and 3 different shades of green. I wanted to call it the Kermit quilt but my husband wouldn't let me.

Nana likes it and that's all that matters.

Saturday, May 12, 2012

A Donating I Will Go

Made these gorgeous quilts for a raffle. All proceeds go to a scholarship for needy students.Hope they get well received.
 
It's about 50"x50".  I had such fun quilting it and making it.


And a close up of the quilting.  In the center points there's a ships wheel, and the stars each have an anchor. I quilted a couple other motifs in the cream squares.


This other quilt was so quick and easy to make. Plus, I think it shows off the fabrics pretty well.  I didn't do any fancy stitching in it, just some stippling.


**Edited - one of my students won this one!! :) ** She loves it!


A huge thank you to Mary Quilts for the free pattern for the strippie quilt. Very fun, very easy.


Sunday, April 8, 2012

Baby Shower Gift - Complete and Ready to Gift

So one of my friends is having her very first baby in a month and the shower's coming up soon.  I let her pick the pattern and colors and I made her a quilt.

Since the little girl is not yet named because the parents are still deciding on names, on the label I just put a generic Baby XXXXX.

All completed on my tiny Brother sewing machine. This was the machine that I got when my Singer went on the fritz and I needed a backup for my backup.  So it's not the best quilting job in the world, but when you're attempting to quilt something this large in such a small throat space, I think it turned out all right.

Measures 52"x52".  So not only is it a good size for a newborn, but also for a toddler to drag around.


Friday, November 25, 2011

A Quilted Wedding Gift

Made a super huge quilt for my friends wedding.  It was quilted by my friend Charisma.

This quilt is about 118"x118".  There's no way that I could have quilted it on my home machine, so I gave it over to the amazingly talented Charisma to work her magic.  And work her magic she did. It's so big that Charisma couldn't actually get the whole thing in the picture.

My friend was so happy to receive the quilt!!  She said it was the only actual gift she received for the wedding.  Everyone else gave her money. I wanted to give her something nice, and I hope this counts as something nice.


Sunday, October 23, 2011

Week 43: October 23-29

Uh oh! I'm starting to run out of ideas for this weekly challenge! I'm sure that I've got a ton of ideas, just need some more time to write them all down in my journal.

My daughter came up with this weeks theme of BUBBLES. I'm constantly amused by her playing with her bubbles outside.

Here are some links if you want to quilt in bubbles!
Bubble Path from Free Motion Quilting Blog

Bubble Path Spiral from Free Motion Quilting Blog

Bubble Wand from Free Motion Quilting Blog